
This Flow is built on the excellent post by John Liu (http://johnliu.net/blog/2017/8/auto-classify-images-in-sharepoint-library-via-flow) from 2017. Since then there have been some changes to the Flow UI and config options, plus some ‘real-world’ gotchas and implications that I felt needed addressing. This post re-uses much of John’s post, but updates it with the changes, clarifications and extensions needed to really make auto-image-classification work with the current state of the art. With personal thanks to John, @johnnliu, for permission to use his stuff. The new Flow is quite a bit bigger, with some changes in the way it does stuff. I have tried to make all the steps to build it as clear as possible, at the risk of being verbose, so that someone who isn’t at the top of their Flow game can follow along.
This blog is HUGE (sorry about that) so this is table of content might help a bit. There is also a Word version available here
Table of Contents
- Gotchas you should know about
- Building your Image auto-classifier
- Overview:
- Set up the Azure Cognitive Service instance
- Set up the SharePoint Document Library
- Set up the Flow
- Let’s see the results
- Doing this in your site
- Top tips and general learning
- Appendix – Dealing with large libraries using looping variables
Gotchas you should know about
Some issues we discovered when developing the new Flow include:
- The target image library must be a Modern Document Library (to which we added to Picture and Image content type). It wouldn’t work on a legacy Picture library.
- Flows only process 100 items at a time in a library. This is a ridiculous setting, but there you go. To get around this you need to change the Top Count to something reasonable, like 5000
- We wanted to use the Keywords column rather than add a Categories column, as John suggested, because this is already baked in at the Content Type level and therefore makes it editable to end users from the edit pane. However, we also needed to use a Filter Query in the Get Files action and this can’t handle multi-line fields; hence we reverted to a Categories
- There are file size and other limits on images that the Computer Vision API will read. We had to capture these issues in the Flow:
- Image must be a JPEG, PNG, GIF, or BMP
- Dimensions must be greater than 50 x 50 pixels (and, FYI, no greater than 4200 x 4200 pixels for OCR)
- File size must be less than 4 MB. It took us ages to find the (surprisingly simple( way to do this.
- Folders are an issue and need to be skipped rather than analysed.
There are lots of other things the Azure Cognitive Services Computer Vision service can do; have a read: https://docs.microsoft.com/en-us/azure/cognitive-services/Computer-vision/Home
Building your Image auto-classifier
Overview:
- Set up an Azure Cognitive Service account
- Set up a SharePoint Online Modern Document Library, containing the Image and Picture content types, Picture Height and Picture Width columns to filter out oversize images and a Categories column to use the output from the Computer Vision API.
- Setup the Flow Connector to talk to the Azure Service
- Set up the Flow to process all the library content, complete with error trapping
- Send compliant new images to Azure for analysis
- Tweak the confidence level of the returned tags
- Format the JSON that’s returned to suit the SharePoint columns and write updates to the columns
- Test it
Set up the Azure Cognitive Service instance
Firstly, work through the following to create a Computer Vision API Cognitive Service in your Azure account. The good news is that the Computer Vision API has a free tier which gives you the first 5000 transactions per month at no cost, so there may be no cost. Note that MS can change that if they want and it’s pretty easy to get carried away and use all 5000 during build, testing and initial roll out.
- Log into your Azure tenant and create or select a subscription
https://portal.azure.com/
This is how you will track and pay for your use of this part of Azure. Create a new subscription if needed (maybe a test and dev subscription initially), or skip this step if you are going to use an existing subscription. - Create Computer Vision API
In the search box, type Cognitive and pick Cognitive Services. Click Create Cognitive Services. You can browse down to Computer Vision. Or take the short route and just type Computer Vision into the Azure search box
Click the Computer Vision icon and then Create. - Give the new service a name (CognCompVision, perhaps), choose your region and select the Free pricing tier
- Grab the Access keys and click Show Access keys, make a careful note of Key 1 – you will need it somewhere around step 5. Make a note of which region the tenant is in (probably UK West)


That’s it for Azure – just make sure that you check your consumption from time to time to avoid being caught out by consumption charges (though these are pretty reasonable).
Set up the SharePoint Document Library
The SharePoint Document Library can be simple – it is just a standard, Modern library; however, it has a Categories column and we added the content types for Picture (we also use a content type for Image, which you can safely ignore).
I also created a view to filter out file types that the service can’t analyse, such as .eps files and folders and to ensure that we have the right columns; it must include Picture Height and Picture Width columns. I called this view All Analysable Documents.

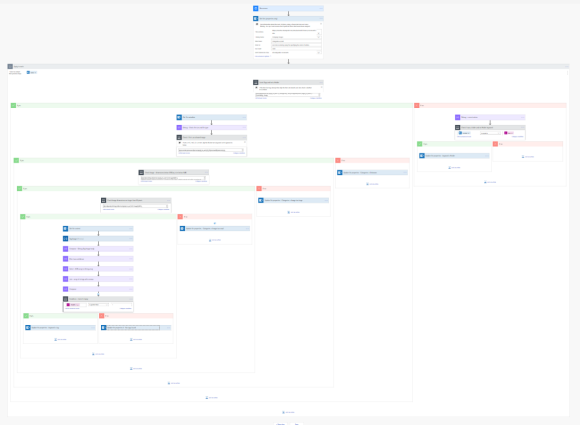
Set up the Flow
Log into the Flow portal: https://flow.microsoft.com/en-us/
1. Create a new Flow.
Start with a trigger, probably a Scheduled Recurrence that runs once per day, unless you want to kick it off some other way. You could start with a Manual trigger and swap it out later.
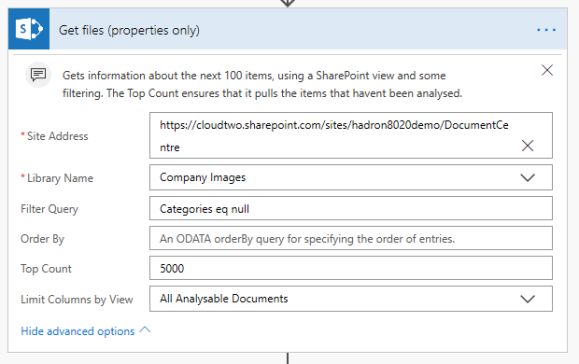
2. Get Properties
- Add a Get Files (properties only) action; this is one of the SharePoint actions, so select your Site (Documents, in our case) and then the library containing the images (Company Images).
- Open Advanced Options and add a Filter Query set to Categories eq null. This forces the Get files to ignore anything that already has data in that field.
- Point it at the All Analysable Documents View we created (select this in Limit Columns by View), so it ignores file types that Cognitive Services can’t handle, based on our view settings.
3. Managing lists longer than 100 items
When we started building our solution we spotted that Flow will only look at 100 items at a time in a library. A spot of internet research indicated that we would have to write our own routine to get it to iterate through a larger library and we came up with a neat way of doing that. After publishing the blog the first time the erstwhile John Liu pointed out an approach that was head-slappingly obvious; all you have to do is set the Top Count in Get File (properties only) to 5000 (there is some suggestion that this can be as much as 100,000 now, but 5000 is plenty for an image library).
The original approach is pretty interesting though, so I have added it as an appendix.
4. Check the files – Conditions, Conditions, Conditions
Now we need to look at each file in turn and decide whether to process it. Although we have set some filters via the View, stuff still sneaks through as the SharePoint View can’t get rid of everything.
We will check for items that are folders instead of files, and whether the items have already been tagged. Then we will see if they are file types that Cognitive Services can process and whether the image dimensions are OK. We should check for the file size but I couldn’t find a way to pull that information without breaking the flow.
Tags and Folders check
- Add an Apply to each action using value from before.
- In the Apply to each control add a Condition. We named this Lacks Tags and not Folder, since that is what we check for. Then I added another Condition control, as we need to skip items that have already been tagged and those which are folders. The clever thing here is that to edited it in Advanced mode, which allows more sophisticated logic than in the basic UI. The following function combines the two criteria. Note the IsFolder property, (which took an hour to discover existed; yours for free):
@and(equals(items(‘Apply_to_each’)?[‘Categories‘], null),not(equals(items(‘Apply_to_each’)?[‘{IsFolder}’], true)))
- For the No branch, I added a Compose action to let us check that we were getting the right things being blocked by the condition filter. I named it Debug – current values. You can safely ignore it. More importantly, there is yet another condition; this one looks at the IsFolder When True it drives an Update file properties action that writes the value Folder into the Categories metadata; otherwise it does nothing.
File Size metadata
- There is a check needed later to ensure that the file size doesn’t breach the 4MB limit. For this we eventually realised that this property can be pulled using the Get file metadata This was pointed at the same site address as everything else, with the Identifier from Get files (properties only) step. This gets used in a compound Condition step in the Image size check section below.
File Type check
- For the Yes branch, things now get interesting at last. Firstly, another Condition control also edited it in Advanced mode; this time it’s to confirm that the file types are one of JPG, PNG, JPEG, BMP or GIF (named accordingly). This function wraps all the options in an Or function, allowing everything to be checked in a single statement. Also, being unforgiving JSON, the case of the extension does matter, so we set everything to lower case with the toLower() command (and not the Lower command that works fine in PowerApps!).
Watch out if you paste this from Word or similar, as they ‘intelligently’ change the apostrophes to disallowed characters! Also look at the crazy JSON notation. Anyway:
@or(contains(toLower(items(‘Apply_to_each’)?[‘{FilenameWithExtension}’]), ‘.jpg’),contains(toLower(items(‘Apply_to_each’)?[‘{FilenameWithExtension}’]), ‘.png’),contains(toLower(items(‘Apply_to_each’)?[‘{FilenameWithExtension}’]), ‘.jpeg’),contains(toLower(items(‘Apply_to_each’)?[‘{FilenameWithExtension}’]), ‘.bmp’),contains(toLower(items(‘Apply_to_each’)?[‘{FilenameWithExtension}’]), ‘.gif’))
- For this No branch, an Update file properties action sets the Categories column to Not Standard File Type.
Image size check
- Meanwhile, in this Yes branch, we do yet another set of checks. This only works if we have added Picture Width and Picture Height to the All Analysable Images view, of course; also note that the internal name for these is Image Width and Image Height. Firstly, to confirm the images dimensions are less than 4200×4200, using a Condition control in Advanced mode with
@and(lessOrEquals(items(‘Apply_to_each’)?[‘ImageWidth’], 4200),lessOrEquals(items(‘Apply_to_each’)?[‘ImageHeight’], 4200))
- And then we extend it further to check that the image is less than 4MB, which makes the entire thing:
@and(lessOrEquals(items(‘Apply_to_each’)?[‘ImageWidth’], 4200),lessOrEquals(items(‘Apply_to_each’)?[‘ImageHeight’], 4200),less(body(‘Get_file_metadata’)?[‘Size’], 4194304))
- We do another Condition in Advanced Mode to check that the dimensions are greater than 50×50:
@and(greaterOrEquals(items(‘Apply_to_each’)?[‘ImageWidth’], 50),greaterOrEquals(items(‘Apply_to_each’)?[‘ImageHeight’], 50))
- For each No branch, further Update file properties actions set Categories to Image size not supported (too large) and Image size not supported (too small) respectively.

5. Analyse and tag the image – finally!
Having done so much set up and issue avoidance, we can, at last, get to the good bit. This is straight-forward compared with what has gone before. We get the file contents and throw those over to Azure analysis service. It delivers back a nasty JSON package from which we extract the suggested tags and set a confidence threshold on those tags so that low confidence suggestions are ignored. Then we convert the JSON to a string and concatenate each tag into a comma separated list of tags. Finally, we write the tag list to the Categories column; if no tags are found we write that instead.
Send image to Cognitive Services
- Grab the file content via Get File Content. Give it our site address and populate the File Identifier with Identifier (we got this from the Get Files (Properties Only) action).
- Add the Predict Tags from Image action. To do this, we need to set up the connection to the Azure Computer Vision service (read up on it here: https://emea.flow.microsoft.com/en-us/connectors/shared_cognitiveservicescomputervision/computer-vision-api/). Add the Connection Name (CognCompVision) and the Prediction Key if required, which you made a note of when you set up Azure Cognitive Services, to have been set up. Click Create to enable the control.

- Pass it the image content using File Content from the previous step.
Extract the tag confidence
- Use a Compose action to grab the tags that come from the Tag Image control – this is just to do some debugging, so that we can see what tags were returned. If we looked at this during a run, we would see a JSON array something like:
[
{
“name”: “screenshot”,
“confidence”: 0.999962568283081
},
{
“name”: “design”,
“confidence”: 0.9409131922668881
},
{
“name”: “theme”,
“confidence”: 0.46361030544202636
},
{
“name”: “fantasy”,
“confidence”: 0.23263329133180224
}
]
We want to clean these up for use in our SharePoint column; but first we need to use the confidence value to only apply tags that we think are probably correct. To do this add a Filter Array action. Give it the tags value to work with and set the Tag Confidence from that to whatever you are comfortable with – we set it to be greater than or equal to 0.8
Extract and parse the tags
- Now we need to turn the JSON array into a comma separated list that we can add to the Categories field. Add a Select action; in the From field, use Body, which comes from the Filter step above and in the Map field we use Tag Name.
- To concatenate the tags, we add the Join action and set From to use Output from the Select we just set up; Join with inserts the comma between each tag, so just type in a single comma: ,
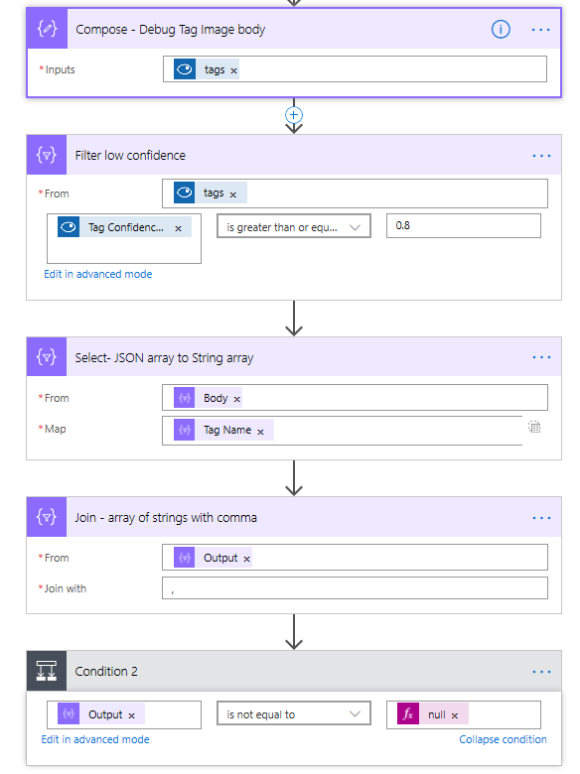
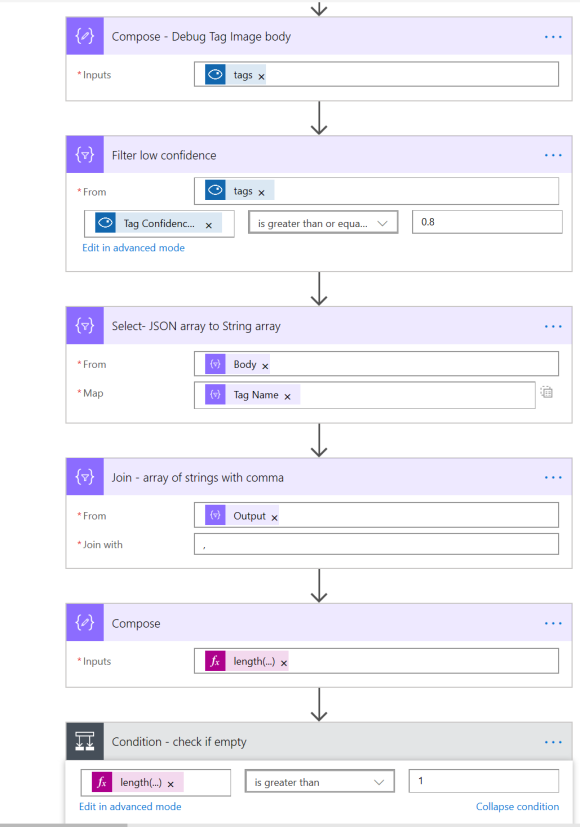
Don’t write if there aren’t any tags
Final step! We don’t want trouble SharePoint Online any more than we must by trying to write anything if there were no tags found after applying the Confidence filter. So add yet another Condition action (our last!). We were going to use the Output from the Join step; set it to not equal to null. However we realised that the output from an image where all the tags have a low confidence isn’t Null, it’s Blank. Instead we checked for an output string length greater than 1 character (because that seemed simple). The Condition was used to check that the length() expression was greater than 1.
For the No branch, add an Update action and set Categories to No tag found.
For the Yes branch, another Update action writes the Output from the Join step to our images.
And that’s it. If everything has gone well then now is the time to turn the Flow On and begin testing and tweaking the confidence value.

Let’s see the results
I ran the updated Flow against a demo Company Images library with some pictures from a couple of talented photographers I know. And some of mine.
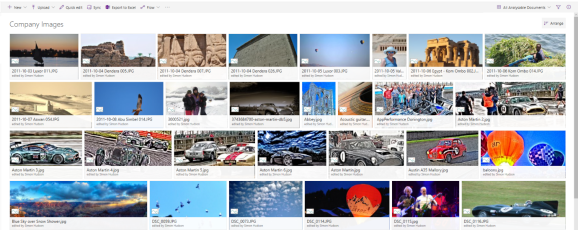
Note the categories field is blank.
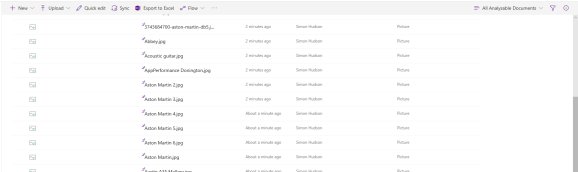
Since we used a Run Daily trigger, the flow won’t appear in the library Flow drop down. Instead you trigger it from the Flow portal.

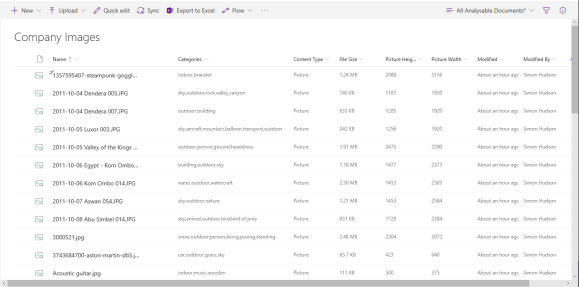
It takes a couple of minutes to run, longer if you have lots of images or a slow connection. You can watch the tags appearing in real time in your library, which is nice.
Doing this in your site
There are a number of things you need to do to get this working in your site. The most important ones are to carefully set up your library with the columns and views, which I described above.
Then you need to make sure that you change all the Site Addresses to point at your sites and then select your library names. There are a bunch of these:
- Get files (properties only)
- Get file content
- Update File Properties x5
Note: some legacy sites just don’t appear in the Library Name dialog – the only way we were able to solve that was to recreate the library (I suspect that it is only Modern libraries that were created after Flow went mainstream that appear in the Flow library selector). Don’t forget to select the View you created in the Get files (properties only) step.
Top tips and general learning
Save frequently. The Flow interface is still not that stable and you don’t want to lose stuff. This happens all the time if you reset the target site, as the selected library becomes invalid and the UI crashes (do a save, exit to the Flow description using the back button, and re-edit that action, starting with deleting the ID string in the Library name).
Name your actions. Every single one; no exceptions. You’ll be glad you did when you need to pick a value from a dozen similarly named Condition steps etc. Then go back and add descriptions – you’ll thank me (I also like flowers and chocolate) when you have to maintain the Flow in 6 months’ time.
Check out the limitations. The Vision API can’t handle big images, small images and a bunch of file types for example. Folders are a real pain as they are sometimes treated as objects and sometimes ignored.
Use the Compose action to track and debug. Vital when you are working out what fails where and for tuning the confidence value.
Learn the Condition syntax for Advanced use. There are things you can do there that save multiple steps.
Error trapping and real world implementation. Our real world flow is loads more complex that John’s initial demonstrator. That’s because the real world is knobbly and a bit broken. If you are estimating development time for projects you should allow a 100% contingency to cover that uncomfortable truth…
A REALLY WIDE SCREEN monitor really helps. Flows are messy and lack elegant navigation in the current UI. You need a big screen to see it all. Super wide helps.
Fewer Conditions helps readability. But we wanted to write different tags for the errors and multiple Conditions is the easy way to do that. There is a neater way to write different tags depending on the fail type, but that’s another blog.
Documenting the Flow takes a lot of time. There is more time invested in this blog than in researching, building and testing the Flow. If you are required to document in detail then add another 100%.
Finally, finally.
Enjoy, let me know about any bugs or any of the steps that aren’t clear. I’m sorry that it’s so long, but that’s kind of the point. Good luck!
Feel free to extend it – notifications, on the fly resizing, additional tagging capabilities, renaming, text extraction, etc. could all be on the list.
I want to seriously thank my colleague, Dan Wanless, without whose ebullient and patient help I would have abandoned this Flow a dozen times. And to another Dan (Westerdale), further thanks for patiently working through these instructions giving feedback and corrective errors and oversights.
Appendix Dealing with large libraries – looping variables
As mentioned, the default is that Flow will only read 100 items from a list. This is a technique for dealing with content in chunks; should that ever be necessary (but setting the Top Count means it shouldn’t be). In the following, we use a loop to ensure that the entire library is processed.
- Add an Initialise Variable action called Loop, with an initial value of 1 and type Integer
- Add an Initialise Variable action called ItemCount, with an initial value of 0 and type Integer
We will use these to track the number of loops through the library the Flow makes in batches of 100, and track how many items are being processed within each loop.
1. Do Until and Getting the right files to process
Now we create the loop that runs all the processing. Our Loop variable has an initial value of 1 (true) and the Do Until process continues until we set it to zero (False). We then get the list of files in the library. The clever bit is that we forced the list to give us the next 100 entries that hadn’t already been processed using opened Advanced Options in Get Files
- Add a Do until control and set the ‘Choose a value’ field to our Loop variable from the Dynamic Content pane. Set it to complete when Loop is equal to 0
- Add a Get Files (properties only) action; this is one of the SharePoint actions, so select your Site (Documents, in our case) and then the library containing the images (Company Images).
- Open Advanced Options and add a Filter Query set to Categories eq null. This forces the Get files to ignore anything that already has data in that field. We make sure it processes the files in order using Top Count of 100. Finally, we pointed this at the All Analysable Documents View we created (select this in Limit Columns by View), so it ignores file types that Cognitive Services can’t handle, based on our view settings.
- Add an Apply to Each action, give it the value from the previous step. Now add an Increment Variable action, to increase the value of ItemCount by 1. We have named these Get item count and Increment Variable
- Add a Condition control, to check if we have processed 100 items yet. Simply set the value to our ItemCount and make ensure it is less than 100.
- For the Yes branch, add a Set Variable action (which we named Set Exit Loop Flag) to set the Loop variable to a value of 0. Do the same for the ItemCount We only hit this branch when all files have been processed.
- For the No branch, add a Set Variable action (which we named Reset Item Count2) to set the ItemCount variable to a value of 0; but leave the Loop variable at 1. This ensures it will do another pass of 100 items.


2 replies on “Auto-Classify Images in SharePoint Online Library – an epic Real-World Flow”
[…] It’s pretty neat; combining the simple and sophisticated worlds. You could even use it in SharePoint without Teams being involved. How about having a Drop Off folder, that users can create their own sub folders in and the content is then tagged, moved, or otherwise processed. If you want to get really sophisticated, then we would use some cognitive services stuff to extract keywords from the document content and use that to further tag the documents. But that a different blog entirely (but like the one on autotagging images) […]
[…] Simon: Auto-Classify Images in SharePoint Online Library – an epic Real-World Flow […]